
Table of Contents
“How to” guides are incredibly user-friendly and applicable to topics in nearly every industry. With proper optimization, they can rank highly on search engine results pages (SERPs).
“HowTo schema markup” is a form of microdata that marketers use to optimize these pages for search. This HTML labeling language makes your pages eligible to earn rich snippets, which can enhance your SERP listing to make it bigger, more engaging, and more likely to be clicked.
What is HowTo schema markup?
HowTo schema markup is a form of structured data which tells the search engine that your content is a “how to” guide. Schema markup is an HTML data type that webmasters use to describe their content in detail:
This is important because it helps crawlers better understand the information on the page. Google also uses schema to create knowledge graphs. It may use schema to generate featured snippets, although the information in featured snippets comes from many sources throughout the content index.
In 2011, Google, Bing, and Yahoo partnered to create the schema.org vocabulary used by site owners worldwide today. It includes markup for all sorts of content, including (but not limited to):
- FAQ sections
- Events
- People
- Reviews
- Creative works (news articles, paintings, etc.)
- Places
- Organizations
Properly adding HowTo schema markup to your homepage, landing pages, and blog posts make your page eligible to earn rich snippets. These SERP listings are larger and more engaging to users. This may lead to a higher potential click-through rate (CTR) and ultimately generate more conversions for your site.
The anatomy of a HowTo rich result
A HowTo rich result has several components designed to improve user experience. Their goal is to share helpful information on SERPs so that users can better decide whether or not to click on a page.
To understand the effectiveness of HowTo rich results, it is helpful to know some of the elements that they’re made up of:
- Type: The kind of schema you’re using (in this case: ‘HowTo’)
- Name: The page’s title in SERPs which should be the same as the title tag
- Description: An interesting explanation of the process that you’re teaching to users
- HowToStep: Tells the search engine how many steps there are in the process
- Text: Written content for each particular step
- HowToDirection or HowToTip: Creates a list of the various steps
- URL: The page location displayed underneath the title
- Prep Time: The time it takes to get the project materials ready (usually expressed in ISO 8601 format).
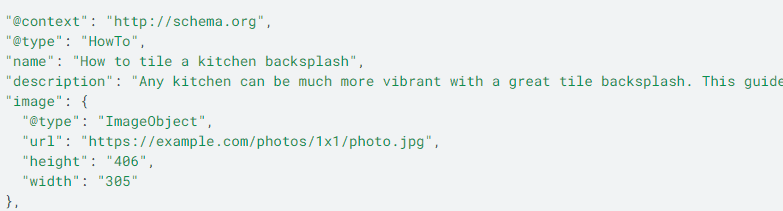
- Image Object: Identifies the most important image for a process or defines an image carousel
- Total Time: The amount of time it takes to complete the process
The two required properties are “name” and “HowToStep” (or “HowtoDirection”). All other HowTo properties are recommended but not mandatory for your schema to work. The more properties you add, the more options Google will have when it displays the listing. Especially if you have a competitive target keyword, you should consider using as many properties as possible.
What are the types of HowTo rich results?
Not all rich snippets look the same. This is for two reasons:
- Some site developers use more properties with their HowTo schema. More properties increase your chances of getting a video, image, list, etc., with your listing.
- The search engine decides what to show users. If you add every property possible to your page, Google may decide that only some elements are relevant for the target keywords.
While listings vary, a few types of HowTo rich results are outlined in Google Search Central’s schema markup guide. To be eligible for these results, you must change your markup to provide all the necessary information.
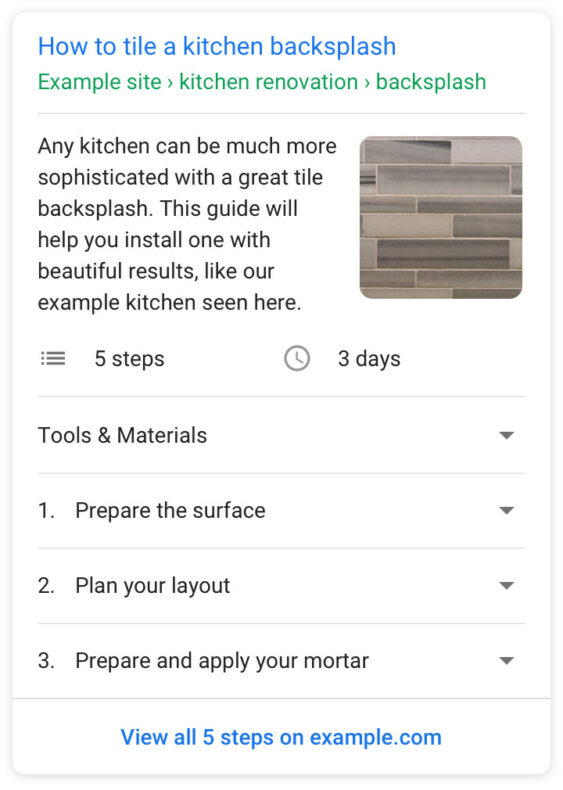
Standard HowTo rich result
The standard HowTo rich result includes a description, image, and step-by-step drop-down menu underneath the title and URL. It usually features an image of the completed task (if provided) and may also show the estimated duration of the task:
This is what some of the properties look like in the backend of the web page:
Remember that you must stipulate that you’re using HowTo schema. If you put another type (breadcrumb, FAQ, etc.) in that portion of the code, the rest of the properties won’t make sense.
In this type of rich result, each step includes a URL, name, HowToDirection, and text property:
Optimize for this type of result when explaining the process doesn’t need pictures for every step. This would include pages for keywords like “how to have a difficult conversation” or “how to forgive someone.” Users should be able to grasp those topics with a written explanation on their own.
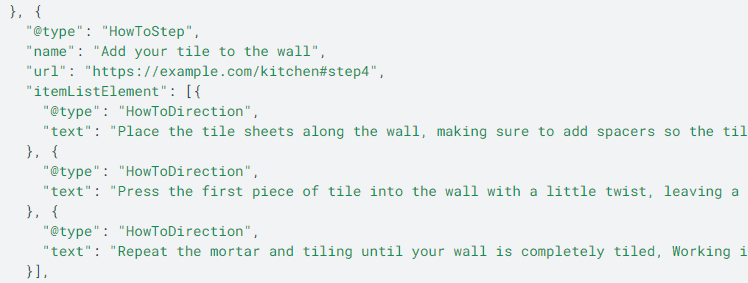
HowTo rich result with images for each step
Another type of rich result shows an image with every step in the process. This changes the code to include images within the HowToStep property. Here is an example of the result:

Notice how the code for each step includes a specific image URL:

Target these kinds of SERP listings for processes that users might do with their hands. This can include anything from finding the best deals on Amazon to changing a tire. In both cases, users benefit from screenshots or images of each step being completed.
HowTo rich result with video
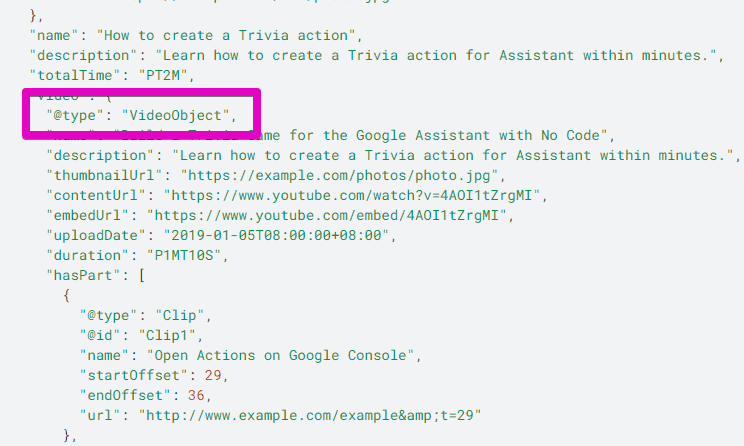
The last type of result includes video content. This breaks a video down clip-by-clip to show users each step in the process. The code looks slightly different, using clip timestamps to tell the search engine which part of the video to display.
The microdata format includes these timestamps in the itemprop attributes of the code:

While the JSON-LD code uses the VideoObject property to define the video clip:
These HowTo schema markups are valuable for detailed, manual processes. Whether that’s building a complex Lego kit or sewing an intricate pattern, users may benefit from a video demonstration that they can pause and follow along with.
Adding HowTo schema to your web page
HowTo schema is a valuable digital marketing resource for both local businesses and ecommerce sites. This markup can help you grow your audience by offering a learning experience straight from the SERP.
If you earn a rich snippet from your schema, you will be able to show how your brand is set apart from the rest. Here are three steps for adding HowTo schema to your web page.
Step one: Create your schema
The first thing you need to do is write the source code. Search engines recognize multiple types of syntax, so you have some options for how to do this.
If you have a base level understanding of HTML coding, you may prefer to develop the schema independently. If you don’t feel comfortable writing it alone, there are ways to auto-generate schema markup for your site.
Manual Code Generation
One option is to write your schema manually. While this doesn’t necessarily require a wealth of coding knowledge, it requires sharp attention to detail.
Consider using Google’s HowTo schema examples to generate your own code. You can do this by substituting your guide’s information, image data, etc., for the pre-made schema.
Some developers use microformat or RDFa syntax to build HowTo schema, but these are less common choices. There are two main structured data options when it comes to schema markup creation:
- JSON-LD: A script type that goes inside the header or body tags within a page. Site owners like it for its simplicity and compatibility with popular content management systems like Wix and WordPress.
- Microdata: A type of HTML code that sits inside of the existing metadata on the pages. It is known for being easy for crawlers to read and verify.
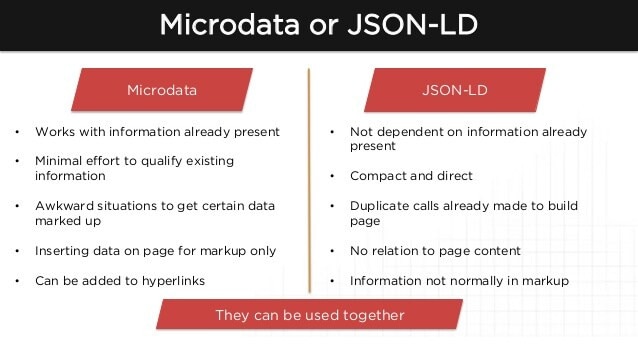
In most cases, JSON-LD is going to be the better option. It is Google’s preferred syntax, and it doesn’t interfere with the rest of your site’s HTML data.
Beyond using Google samples as a template for your own code, you can follow a video tutorial online. Developers can walk you through the steps and point out common structured data mistakes that you might overlook otherwise.
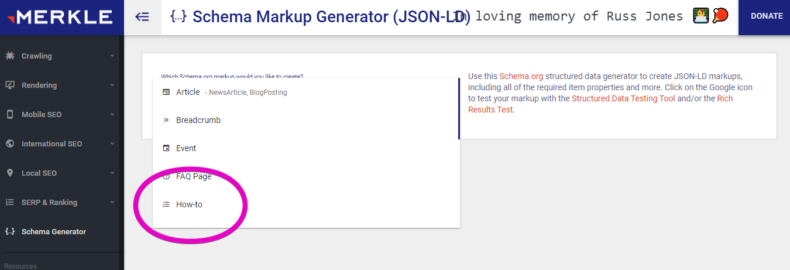
Schema Generators
Schema generators are an important resource for those who lack the patience or background knowledge for manual coding. Visual coding allows you to plug in your content details to a generator. Once you’ve provided the proper information, this tool creates the markup you need to add to your site.
Several WordPress SEO plugins have schema markup capabilities. Some of the most popular options are:
You can use a tool like Google’s Structured Data Markup Helper or the Merkle Schema Markup Generator outside of WordPress to input your property data. Start by selecting the “How-to” schema type:
Then, input the details of your how-to guide in the form provided:
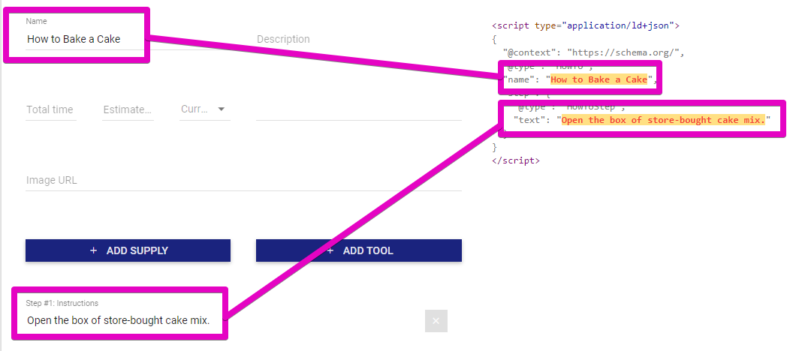
Notice that as you enter and change details, the code on the right automatically updates. This method can save you a lot of time if you have limited experience with writing syntax. It ensures that no bracket, parenthesis, comma, etc., is missed.
Follow content guidelines for HowTo schema markup
All HowTo schema must follow Google’s guidelines to be considered for a rich snippet. Here are some of the requirements:
- The schema must be in RDFa, JSON-LD, or microdata format.
- Google must have access to the data. Noindex tags and robots.txt files cannot block crawler access.
- Content must adhere to Google’s content restrictions. They include things like sexually explicit material, violent or dangerous content, hate speech, and more.
- Data should align with the Google Webmaster Guidelines, making it easier for crawlers to analyze and index web pages.
- Your code needs to follow the HowTo schema guidelines to work properly.
If you don’t follow Google’s rules, your schema markup won’t generate a rich result. Aside from search engine compliance, you also need to ensure that the data works. Several websites offer markup testing tools that help you find and fix errors.
Step 2: Test your schema markup
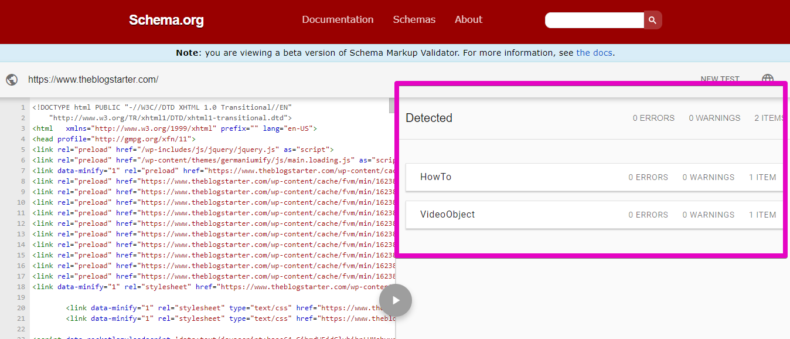
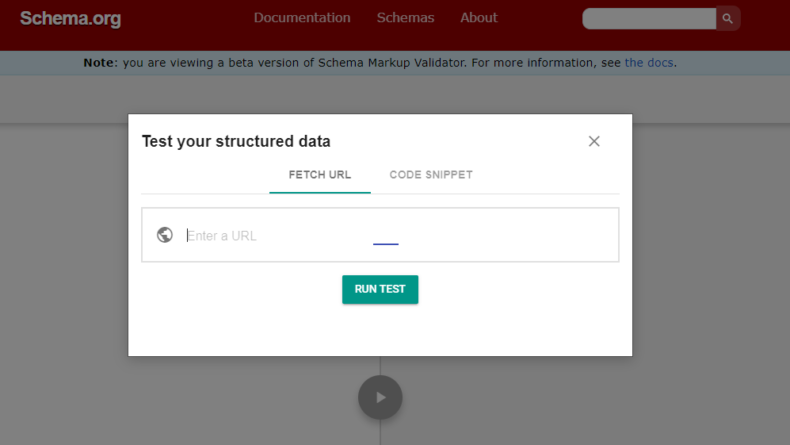
In 2021, https://schema.org published its own markup testing tool. This resource, called the Schema Markup Validator, is simple to use. You start by entering your page URL or the code snippet that you’ve written:
The system analyzes your URL or code and identifies which types of schema you have:
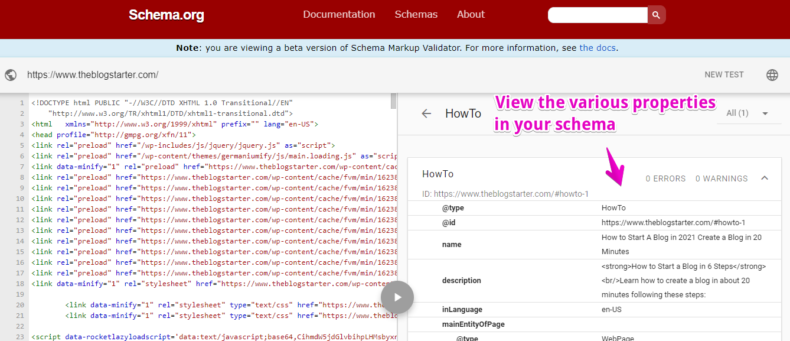
From there, you can view each type of schema separately. If you have any errors, the validator will show you where they are in the syntax so that you can correct them:
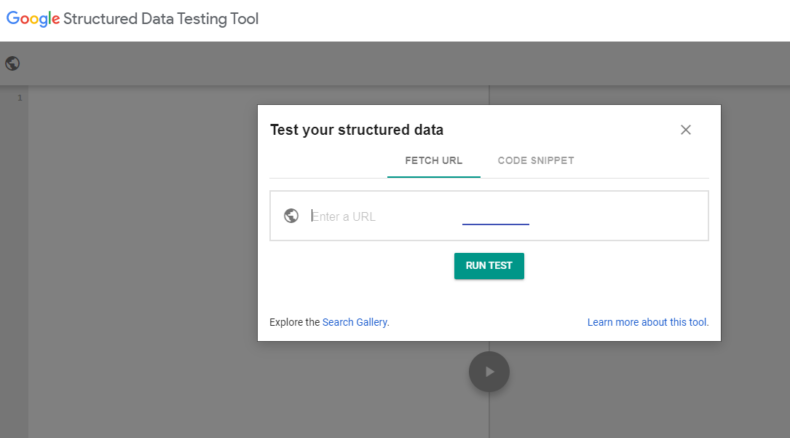
Another great tool to use is Google’s Structured Data Testing Tool:
This functions exactly like the schema validator tool, requiring either a URL or code snippet to analyze.
Common errors in HowTo schema markup
There are several common errors that people make when creating schema markup. They are:
- Incorrect value type: Mislabeling or misspelling your how-to type in the “step” portion of the code.
- Parsing error — Missing “,” or “}” You haven’t closed a bracket, or you have left out a comma at the beginning of a new section.
- Parsing error — Missing “,” or “]” in an array declaration: You’ve forgotten to close a bracket somewhere in your code.
- Missing value within a field: Your code is missing either the “name” or “HowToStep” property, both are required for successful implementation.
- Recommended property value: The testing tool suggests that you add a certain property if you have the information available.
As long as you use a validation tool to check your work, these issues won’t affect the page. Address any errors before you try to add the schema to your site. If you mess around too much with the source code, you could cause other non-schema-related errors that impact the rest of the HTML.
Step 3: Publish your schema
After you’ve verified that everything works, you can go ahead and input the markup on your site. You may want to use the Google Search Console Rich Results Test to preview your schema before displaying it. This gives you the chance to make changes and re-validate the schema markup without having to mess around with the existing code. Publish the web page and then submit a crawl request to the search engine. This can speed up the process of getting your site in front of users.
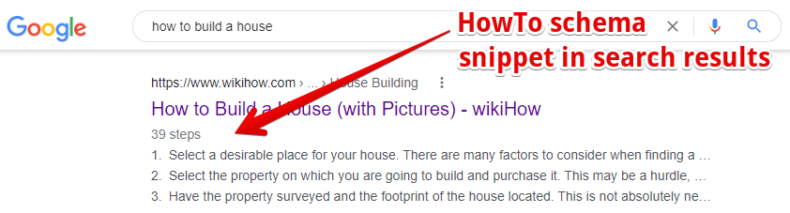
Ultimately, the search engine decides what type of information to display on SERPs. You may end up with a rich snippet that differs from the previously-mentioned examples. Here is an example of a site that used simple schema to earn a larger amount of space on the first page of results:

While this listing includes additional information past the meta description, it doesn’t have the visual elements that some other types of results have. It’s important to remember that using schema won’t guarantee rich results, but it does improve how the search engine understands your page. So, even if you don’t end up with a decked-out listing, HowTo schema can still help you earn a top spot on the SERPs.
Get a complimentary SEO audit
How-to guides are very user-friendly, but they won’t automatically earn high rankings. Prove how comprehensive and valuable they are using HowTo markup from http://schema.org. It can improve your chances of generating rich search engine results, increase your CTR, and widen your audience.
Want to see how you’re doing with SEO? Get an instant SEO audit below. Or, schedule a free consultation to see how intent SEO can boost search traffic revenue by 700%.